


How to Build Your Own Sauna - Step by Step with Finnmark
With Finnmark’s trusted guidance and expert advice, you’ll have the knowledge and support you need to learn how to build your own Home Sauna with complete confidence. This detailed guide is designed to lead you from the initial idea to enjoying your very first sauna session. You’ll find everything you need to know, from careful pre-planning tips and selecting premium materials, to step-by-step instructions on construction and maintenance. As well as enhanced well-being tips.
Learning how to build a sauna at home is a truly rewarding project that combines craftsmanship, wellness, and relaxation. Whether you’re interested in learning how to build an Outdoor Sauna or how to build an Indoor Sauna DIY project, Finnmark is here to guide you every step of the way.
Finnmark provides the expertise and tools necessary to create a sauna that combines practicality with traditional, aesthetic design. Explore our DIY Sauna Page for further information on how to build your perfect sauna, and begin your journey today, bringing warmth and wellness right into your home.
Contact Us today and book in for a FREE consultation – We understand that designing and building a sauna can be a big task, that's why Finnmark is here is help. From guidance and tips to helping assemble your basket of sauna materials.
Part 1
How to Build a Sauna UK: Pre-Build Considerations
Before construction starts, it’s essential to consider several important factors. These include selecting the ideal location, understanding space requirements, checking planning permissions, and identifying both internal and external needs. Taking time to plan thoroughly at this stage sets the foundation for a smooth, successful sauna build tailored to your home.
Choosing the Location: Indoor vs. Outdoor
Deciding whether you need guidance on how to build an outdoor sauna or how to build an indoor sauna depends on several key factors. Your ideal sauna design, available budget, choice of materials, timeline for completion, and the space you already have will all influence the direction of your project. Below we will explore the different types of saunas more in depth.
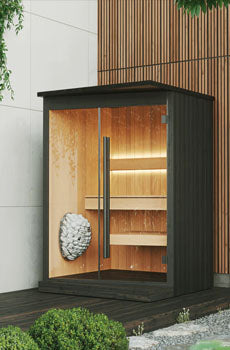
Outdoor Saunas
Outdoor Sauna Options provide a tranquil, nature-connected experience and often become a standout feature in your garden. Their standalone design allows for more flexibility in size and layout, but they may come with additional costs, especially if you need external building materials.
If you build your sauna outside, plan the cable routes from the sauna to a consumer unit to power any electrical components, such as an electric sauna heater. Also, If you intend to install a Wood-Burning Sauna Heater Type, it is strongly advised to consult a HETAS engineer and think about suitable flue connections at the early stages of planning.
Always Check Planning Permissions
It's important to check with your local authority regarding any planning permissions or building regulations before starting your sauna project. Requirements can vary depending on your location, the size of the structure, and whether it’s indoors or outdoors. Taking this step early on ensures your build is fully compliant and avoids unexpected delays or complications later

Space Requirements for a Traditional Sauna
For anyone learning how to build an outdoor sauna or how to build an indoor sauna, it's important to consider additional space requirements, such as allocating extra room for a changing area or an adjacent wet room to enhance functionality and comfort.
As a general guideline, the internal height of a sauna should be around 2.1m from the finished floor. This allows space for a two-bench-tier design and a step. In most home saunas, we recommend the upper bench at 1050mm, the lower bench at 600mm, and the step at 300mm. Keep in mind that the wall build-up will slightly reduce the internal dimensions, adding around 70–80mm to each wall. It's also essential to plan for safe movement and easy access within the space to ensure a practical and comfortable layout.
A comfortable 3-person sauna typically measures 2m x 2m, but sizes can vary depending on your space. There’s no strict minimum, but ensure enough room for benches, the sauna heater, and clearance based on the heater’s safety distances, always found in the heater manual.
Check the Power Supply
At this stage, you should check what power supply is available on site. Most UK homes have a single-phase 240-volt supply. Some homes and large commercial settings may have a three-phase 400V power supply. The type of power supply available will determine the maximum power (kW) of the electric sauna heater type you can install.
Once the power supply to the property has been established, the next areas to check are your distribution board (consumer unit) and service head. The distribution board contains the fuses for the property, and a qualified electrician should be consulted prior to installation to confirm that the sauna's power requirements can be met. A qualified electrician can identify the maximum load capacity of your property and review existing circuits and their loadings to understand what spare capacity you have for your sauna.
We have outlined important electrical considerations in the following section in more detail.

Planning Considerations & Building Regulations
In the UK, small detached saunas typically fall under permitted development, but it’s important to confirm this with your local planning authority before proceeding. If you plan to install a wood-burning sauna heater type, check whether your area is designated a smoke-free zone, as this may affect your installation options.
Equally important is ensuring full compliance with building and electrical regulations to guarantee safety and optimal performance. Always carefully review the instruction manuals for every product you choose, whether it’s fireboard, insulation, lighting, electric or wood-burning sauna heaters, adhesives, or sauna accessories.
Selecting materials specifically designed for the hot, humid sauna environment is essential to maintain durability and safety throughout your sauna’s lifespan.
For a full rundown on everything you need to consider, read our full guide on Sauna Regulations in the UK.
Electrical Considerations
All electrical work for your sauna should be handled by a qualified electrician. It's important to check early in the planning process whether your power supply is single-phase or three-phase, as this directly affects which sauna heaters are suitable for your space. This is particularly important when it comes to Electric Sauna Stoves.
Heater Power Rating
The heater’s power rating (kW) is a key factor and should be specified upfront to ensure your sauna heats efficiently and safely. When calculating the sauna’s heating needs, consider the total computational volume, not just the physical space. This includes adjustments for uninsulated areas like glass surfaces, which increase heat source loss.
For every square meter of single-glazed glass, add 1.5m³ to your sauna volume; for double-glazed glass, add 0.75m³. This ensures your heater type can compensate for heat loss and provide consistent warmth. Most electric sauna heaters up to 9kW can operate on single-phase power and will draw up to 40 amps of power. However, some models may require a three-phase supply, so it’s important to check the specifications of each unit. Larger, commercial sauna heaters require a three-phase supply. If you have a large sauna space and plan to include features like a glass wall, you will likely need a heater that requires a three-phase supply. In the case that a three-phase supply is not available, it may be worth considering a wood-burning sauna heater instead.
Sauna Computational Volume Calculation Example
In this example, we have a sauna with internal dimensions of 2 metres by 2 metres by 2 metres, giving a total volume of 8m³. The front wall of the sauna is made entirely of glass, measuring 2m wide by 2m high, which equals 4m² of glass.
To calculate the Computational Volume, which is used to determine the appropriate heater size, we must consider any glass surfaces. Glass loses heat more quickly than timber, so it increases the effective size of the sauna for heating purposes. The adjustments are:
-
Single-glazed glass adds 1.5m³ per 1m² of glass
-
Double-glazed glass adds 0.75m³ per 1m² of glass
Sauna With Single-Glazed Glass
|
Component |
Calculation |
Result (m³) |
|
Sauna Volume |
2m x 2m x 2m |
8m³ |
|
Single-Glazed Glass Area |
2m x 2m = 4m² |
|
|
Glass Adjustment |
4m² x 1.5m³ |
6m³ |
|
Total Computational Volume |
8m³ + 6m³ |
14m³ |
Sauna With Double-Glazed Glass
|
Component |
Calculation |
Result (m³) |
|
Sauna Volume |
2m x 2m x 2m |
8m³ |
|
Double-Glazed Glass Area |
2m x 2m = 4m² |
|
|
Glass Adjustment |
4m² x 0.75m³ |
3m³ |
|
Total Computational Volume |
8m³ + 3m³ |
11m³ |

Saunas as a “Special Location”
Saunas are identified as a “special location” under wiring regulations, meaning special measures must be taken due to the unique environment and challenging conditions.
Firstly, a residual current device (RCD) must be provided as circuit protection on all circuits except for the sauna heater. Section 703 of the wiring regulations explains that “RCD protection need not be provided for the sauna heater unless such protection is recommended by the manufacturer.” This is because a small amount of latent and ambient moisture in the heater may cause nuisance tripping.
Without RCD protection, additional protective measures should be taken to ensure the cables are routed and installed safely. It is recommended that the supply cable have some form of mechanical protection, like steel wire armour (SWA), along its route from the consumer unit to a local point of isolation at the sauna.
Inside the sauna, the conditions influence the specification of the cables and equipment. Cables should match or exceed the specification stipulated in the installation manual. For electric sauna heaters, the power supply cable is usually specified as H07RN-F rubberised cable or SiHF silicone rubber cable. Ensure your electrician consults both the installation manual and section 703 of the wiring regulations so they are familiar with the requirements of a sauna.
Most electric sauna heaters have a digital thermostat and a control unit, the placement of which need to be considered. It is important to check the heater instruction manual and adhere to the rules on where to place the thermostat and the control unit.
For further electrical considerations, it’s important to pair it with a compatible Control Panel to ensure proper operation. Sauna lighting is another key factor, both for safety and ambience. Always choose vapour-proof, heat-resistant fixtures specifically designed for sauna use, and install them away from direct heat source exposure.

Sauna heaters are one of the exceptions in the electrical wiring regulations. Always adhere to manufacturer's guidelines, use suitable cables and work with a certified electrician.
Sauna Ventilation
A well-considered sauna ventilation system is essential for creating a safe, comfortable, and long-lasting sauna environment by ensuring good air quality. Effective airflow helps circulate heat evenly, prevents air stratification, prevents mould growth and regulates humidity levels. This not only improves air quality but also enhances the overall sauna experience.
In most cases, it is recommended to have two points of air intake and two points of exhaust. The ventilation set-up will depend on the shape and location of the sauna, as well as whether you have an electric or a wood-burning sauna heater. It's important to tailor the system to your specific installation requirements.
A Typical Ventilation System for a Sauna with an Electric Heater
-
Intake Vent: A vent often near the base of the heater, always left open to allow fresh air in. Introducing fresh air above the top of the heater can also be an option, but it may interfere with your thermostat. Consult your heater’s installation manual for the best practice.
-
Door Gap: A standard sauna set-up typically includes an approximately 15mm gap under the door to ensure proper air circulation. However, recommended door gaps can vary depending on the type of ventilation system. Passive ventilation and installations with a wood-burning heater often require a larger gap. The ideal ventilation depends on the unique shape, size, type, layout and location of the sauna; it’s important to tailor the system to your specific installation.
-
Exhaust Vent: A vent in the back wall, diagonally opposite the heater, just below bench level (usually level with bathers’ feet when sitting on the upper bench). Keep it open at all times to enable airflow.
-
Drying Vent: Position a vent in the ceiling or near the ceiling, typically opened after use, to help dry out the sauna.
-
In-line Fan: The exhaust benefits from a high-temperature in-line extraction fan, preferably with adjustable speed. Aim for six air changes per hour.
-
Metal Components: Use only metal ducting and fan components, as plastic may melt or fail under high temperatures.
-
Single Penetration: The dump and exhaust vents can be connected in front of the fan to share a single wall penetration for simplicity.
Example Ventilation Set Up for an Outdoor Sauna with Passive Ventilation
A typical passive sauna ventilation and installation with a wood-burning heater includes both intake and exhaust points to support airflow and maintain comfort.
INTAKE
-
A 50mm gap under the entrance door, even if it opens to the outdoors.
-
A 125mm vent leading to the base of the heater, or as near as possible. The vent may be installed as adjustable if the quantity of incoming cool air is a concern.
EXHAUST
-
125mm adjustable exhaust vent(s) between the upper and lower benches, positioned diagonally opposite the heater.
-
A 125mm vent in the ceiling, positioned directly above the other exhaust. This is a dump vent and is kept closed during normal operation. It can be opened to quickly dump heat or to dry out the sauna after use.
In summary, for both ventilation setups, the intake points can be a gap under the door and a vent in close proximity to the sauna heater. The two points of exhaust can be a vent at head height, which is sometimes considered the drying vent to allow the sauna to dry off after use. The second exhaust is often located lower down in the sauna, under the benches. This assists in bringing the heat and humidity down, preventing heat and humidity stratification. Multiple exhausts may be installed to account for larger saunas with multiple benches across different walls.

Sauna Flooring
Choosing the right flooring for your sauna is crucial for both functionality and aesthetics. The floor must withstand extreme temperature fluctuations, high humidity levels, and frequent water exposure while providing safety and ease of maintenance. This guide will help you understand your options and make the best choice for your sauna project.
Tiled Flooring: The Recommended Choice
Tiled floors are the preferred option for most sauna installations, offering superior durability and functionality compared to traditional wooden alternatives. Tiles provide excellent heat resistance, are easy to clean, and respond well to specialized sauna cleaning products.
Key Benefits:
- Heat resistant and durable
- Easy to clean and maintain
- Hard-wearing surface that lasts longer than wood
- Aesthetically pleasing with various design options
- Better suited for frequent water use
Anti-Slip Requirements for Safety
Safety should be your top priority when selecting sauna flooring. All sauna floors must meet appropriate anti-slip ratings to prevent accidents in the humid, wet environment.
Required Ratings:
- Residential saunas: R11 or higher anti-slip rating
- Commercial saunas: R12 or R13 anti-slip rating
These ratings ensure adequate grip even when the floor is wet from steam condensation or water poured over the sauna stones.
Drainage Systems: Essential for Proper Function
Installing a drain in your sauna is highly recommended as it facilitates easy cleaning and allows users to pour generous amounts of water over the sauna stones to create the perfect "löyly" (soft steam). A proper drainage system also enables washing within the sauna space if required.
Drainage Options:
- Slot drain: Provides discreet, linear drainage along one edge
- Central drain: Positioned in the middle with equal falls toward the center
- Offset drain: Positioned beneath benches for a less visible appearance
The most suitable drainage solution will depend on your sauna's layout and the location of your waste outlet.
Wooden Floor Alternative: Duckboard Systems
If you prefer the traditional feel of wood flooring, a duckboard system offers a practical compromise. Duckboards are removable wooden slats that sit above the actual floor surface, allowing for easy lifting and thorough cleaning when necessary.
Duckboard Advantages:
- Maintains traditional wooden aesthetic
- Allows air circulation beneath
- Easy to remove for cleaning
- Can be replaced individually if damaged
However, wooden floors require more maintenance than tiled surfaces and may not be as suitable for frequent water use.
Popular Tiling Materials for Saunas
Several materials work exceptionally well for sauna flooring, each offering unique aesthetic and functional benefits:
Natural Stone Options:
- Slate: Distinctive characteristics that complement various wood finishes
- Soapstone: Popular in Nordic design, naturally heat-resistant
- Quartzite: Durable and available in various textures
- Granite: Extremely durable and heat-resistant
Manufactured Options:
- Porcelain tiles: Consistent quality and wide range of designs
- Ceramic tiles: Cost-effective with good heat resistance
Examples of our sauna flooring projects:


Installation Considerations
When installing sauna flooring, consider these important factors:
Floor Falls and Gradients:
- Ensure proper slope toward drainage points
- Maintain consistent gradient for effective water flow
- Consider user comfort when determining slope angles
Integration with Design:
- Coordinate flooring with overall sauna aesthetic
- Consider how flooring interacts with wall cladding and bench design
- Plan for smooth transitions between different materials
Maintenance and Longevity
Proper maintenance will extend the life of your sauna flooring and ensure optimal performance:
Regular Cleaning:
- Use specialised sauna cleaning products
- Clean after each use session when possible
- Pay attention to grout lines and drainage areas
Long-term Care:
- Inspect anti-slip properties regularly
- Check drainage function periodically
- Address any damage promptly to prevent larger issues
A well-chosen and properly installed sauna floor will provide years of safe, functional service while enhancing your overall sauna experience. For more information, check out our full guide on cleaning your sauna.
The Sauna Interior - Pre-Build Considerations
When learning how to build a sauna at home, planning the sauna interior layout is just as important as the structure itself. Including inside home sauna building materials and components such as fireboard, insulation, cladding, bench boards, and doors, every detail plays a role in comfort, function, and authenticity, ensuring your DIY home sauna delivers the best possible experience from the inside out.
Wall Build-Up
A typical wall build-up includes fireboard, sauna-safe insulation, a vapour barrier, sauna battens, and cladding, adding roughly 72–84mm to each wall. If your sauna is within a timber-framed space, a fireboard can offer added protection, though it's not always required (e.g., in blockwork rooms).
Insulation
Standard PIR insulation boards are not heat-safe beyond +60- 80°C, whereas sauna-safe insulation boards, such as Kingspan Sauna- Satu and Finnfoam, are heat-safe up to +100°C for long periods, and up to +250°C for short periods. Standard PIR insulation can also begin to off-gas toxic hydrogen cyanide after being exposed to hot air. Sauna insulation boards also act as a vapour seal. The boards are foil-faced and backed, allowing easy sealing using aluminium tape and preventing thermal bridging from occurring in the interior structures. They stop condensation from accumulating and the risk of mildew, mould, and rot growth on the timber structures.
Insulation boards are easy to fix on the walls with stainless screws and insulation washers, and can be joined and sealed with expanding foam (i.e. Pinkgrip or Everbuild) and aluminium foil tape respectively. Another alternative is to use rock wool and aluminium foil vapour barrier.

Sauna Battens
Sauna Battens play a vital role in allowing airflow between the insulation and interior cladding, helping manage moisture and prevent condensation. The battens are secured onto the insulated and vapour-sealed layer, perpendicular to the sauna cladding. This creates a gap between the insulation boards and the back face of the interior cladding.
For vertical cladding, install specialist-shaped rhombus sauna battens that allow any excess water and condensation to run down the vapour barrier, over the top of the chamfered edge of the batten and down the grooves on the back of the cladding.
Alternatively, cross-battening may be done to maintain airflow and drainage behind vertical cladding. Sauna battens should be at least 20 mm thick and 45 mm wide. A suitable batten spacing is 400 mm. Thermo-treated pine battens provided additional stability to the substrate, reducing the risk of cladding moving due to battens warping or shrinking.
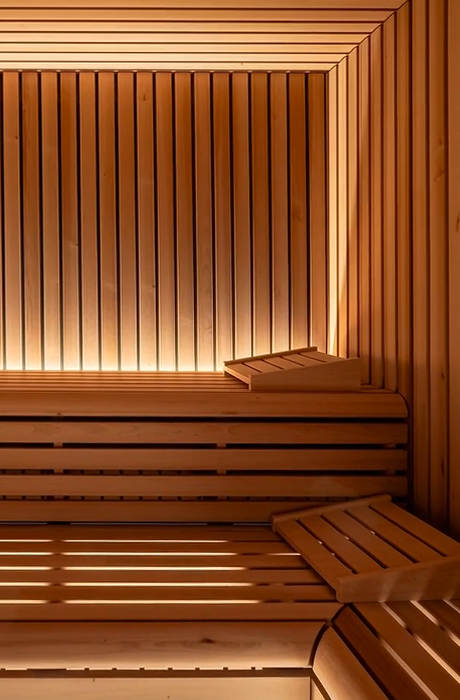
Sauna Cladding - The Sauna Walls & Ceiling
After the insulation and sauna battens have been installed, you can secure the Sauna Cladding onto the battens with stainless steel fixings that can be hidden within the grooves of the cladding.
Pick a cladding profile of your choice. You can opt for a traditional STS4 or STP cladding profile, or add a feature wall using more specialist profiles, such as the STEP profile, wooden feature wall panels or even tiled finishes as splashbacks behind the sauna heater. Most sauna cladding panels have an easy-to-install tongue and groove design. It is important to install the sauna cladding with precision to ensure the longevity of your sauna. We recommend treating the wood sauna with paraffin oil to protect it from humidity and heat. It is best practice to repeat the paraffin oil treatment on a yearly basis.
Always refer to the recommended wastage allowance for each timber species, as the approximate materials loss during installation can vary between 5 and 15%.

Diagram of the wall buildup.
The installation of the sauna cladding is perpendicular to the batten orientation. If you wish to install the wall panels horizontally, make sure that the battens have been installed vertically. For a vertical cladding installation, the battens should be installed horizontally.
You can use a narrow crown staple gun and stainless steel staples (type 90), or a brad nailer with stainless steel brad nails (18 gauge) for the cladding installation. Some cladding profiles work with tongue and groove cladding clips which are nailed or screwed to the battens.
Preparation
-
Treating the Timber: Sauna timber can be protected further from moisture and dirt by sealing it with a light mineral oil, like paraffin oil or a water-based sauna wax. Apply the treatment to all faces and ends of the sauna cladding panels to protect the wood prior to installing the cladding
-
Cutting for Fixtures: Drill holes for cables or ventilation before installation.
-
Check the Batten Spacing: Make sure the battens have been installed straight and level before beginning the cladding installation. A suitable distance between the sauna battens is 400 mm.
Ceiling Cladding
-
Installation Order: Start with the ceiling, extending boards beyond the wall cladding plane.
-
Attachment: Secure boards with nails through the tongue side, concealing fixings.
Wall Cladding
-
Alignment: Install wall boards with a 10 mm gap at the bottom to prevent moisture absorption.
-
Vent Covers: Secure sauna vent covers over ventilation openings.
Finishing Touches
-
Corner Mouldings: Attach around the ceiling perimeter and corners for a polished look. For most cases, install the ceiling corner mouldings first, then the ceiling cladding. After that, fit the vertical corner moulding and finally install the wall cladding.

The installation of the sauna cladding is perpendicular to the batten orientation.
Sauna Mouldings
Sauna corner mouldings are an important finishing touch that enhances both the appearance and durability of your sauna. As an example for SI 25x25 mm mouldings, the mouldings are installed in the interior corners where the cladding panels meet, covering any gaps and creating a clean, polished look. These are screwed on with stainless steel “lost head” flooring screws.
The installation method depends largely on your chosen moulding. Some mouldings require installation during the cladding process, so may be pinned or screwed to the battens. Other mouldings are pinned and glued after the cladding is installed. Use stainless steel finishing nails or a wood-safe adhesive rated for high temperatures to secure them in place.
 Sauna corner mouldings are often overlooked in a sauna build, but they provide a clean, finished look by neatly concealing any gaps or cut edges in the cladding.
The Sauna Interior - Layout & Ergonomics
This section explores the layout and ergonomics of your sauna interior, covering everything from bench configurations, the entrance and windows to heater selection and placement. Thoughtful design choices can dramatically impact comfort, heat source distribution, and the overall experience.
Bench Configuration
Planning how to build a sauna at home involves choosing your Bench Configuration; it can be as simple or sophisticated as you would like, ranging from classic two-tier layouts, opposing benches with raised floors, to L-shaped, U-shaped, or custom-designed body-form loungers. Finnmark also offers Ready-Made Sauna Benches.
You can choose the same wood type as the wall and ceiling cladding for a uniform look or mix different timber species to create contrast and unique design features. We recommend spruce sauna wood or thermo spruce timber for the bench framing timber. Consider whether you require adjustable feet and additional boards for the backrests.
Since heat naturally rises, the warmest air in a sauna tends to gather toward the ceiling. Even with effective ventilation, some temperature difference between the floor and ceiling is inevitable, and a perfectly even temperature (an isotherm) is hard to achieve. For this reason, traditional sauna design focuses on generous upper bench space. Many cultures position benches so that bathers' feet sit above the heater, ensuring full-body warmth and more effective steam ("Löyly").
Standard Home Sauna Bench Guidelines
For a standard home sauna, we recommend the following:
-
Ceiling height: 2100 mm from finished floor level
-
Upper bench: 1050 mm from floor level, and at least 600 mm wide
-
Lower bench: 600 mm from floor level, approximately 400 - 500 mm wide
-
Step: 300 mm from the floor level for easy access to the upper benches
 There are multiple bench design options for saunas from a classic two-tier set-up to raised floors.
Sauna Doors
For safety, Sauna Doors should open outward and be positioned near the heater to support air circulation. Sauna doors should be built from durable and heat-safe materials. Glass sauna doors are most common in indoor saunas, but you can also opt for a wooden door. Glass finishes range from clear to tinted bronze, grey, frosted glass and darkened for additional privacy.
A high-quality sauna door is often made of tempered glass, and the handles are either a stainless steel and wood combination or wood on both sides. You want to avoid metal handles inside the sauna, as these will get too hot to touch.
Most sauna doors are timber-framed with around 8 mm toughened glass, which can be customised. A 15–50 mm gap at the bottom of the glass allows fresh air intake. The door opening should typically be 10 mm larger than the frame, e.g., a 690 x 1990 mm door requires a 700 x 2000 mm aperture. However, exact sizing may vary, so always check your specific door’s requirements.
Sauna Windows
Incorporating windows into the sauna design is an excellent way to bring in natural light and create a more spacious and open feel. Bear in mind that windows and doors are uninsulated areas that should be accounted for when calculating the computational volume of the sauna. A sauna-safe double-glazing solution is argon-filled and silicone-sealed. The formula we tend to use in our bespoke installations is double-glazed 6-12-6, with silicone-sealed aluminium spacer.
Heater Type & Extras
Choosing between an Electric or Wood-Burning Sauna Heater should be based on your overall design, bench layout, and desired experience. Electric heaters offer precise temperature control, ease of use, and are well-suited for saunas both indoors and outdoors, especially when convenience and quick heating are priorities. As mentioned in the earlier sections, check the site’s power supply and whether it is single-phase or three-phase and has a suitable capacity for the power of the required sauna heater.
Electric saunas will need a compatible Controller and suitable Cables. Ensure all necessary electrical components are in place, including an isolator, rubberised cable, and armoured cable connected to the consumer unit. These details are best confirmed and planned in consultation with a qualified electrician.
 Modern electric sauna heaters come with flexible control options, including Wi-Fi connectivity, allowing you to conveniently operate your heater from your smartphone.
Wood-burning heaters provide an authentic, traditional sauna atmosphere with the comforting aroma and crackling of burning wood, making them ideal for outdoor options or rustic settings. Wood-burning options need a specified Flue Kit and potentially some Heat Shielding. Also, it's important to check whether you're located in a smoke-free zone with the local authority when considering a wood-burning sauna heater.
Sauna Stones or sauna rocks, used with both electric and wood-burning heaters, are often sold separately. Additional accessories may include heater safety railings, mounting collars, and decorative stones, each contributing to improved safety, functionality, or visual appeal within the sauna space.
For further guidance, check out our How To Choose The Best Heater Controller For Your Sauna guide.

Wood-burning heaters guarantee a traditional experience. Image by HUUM.
Heater Size - Calculating Sauna Computational Volume
Choosing an underpowered heater might seem economical at first, but it can lead to disappointing performance and costly issues. You’ll struggle to reach and maintain hot sauna temperatures, reducing the overall experience. Additionally, the heater will be forced to work harder than intended, causing the heating elements to burn out faster and leading to higher maintenance and replacement costs over time. Always size your heater appropriately for the computational volume of your sauna.
To choose the right sauna heater, it's essential to calculate your sauna’s computational volume, especially if your design includes glass elements, which lose heat faster than timber. Here’s an example:
Let’s say your sauna’s internal dimensions are 2m x 2m x 2m, giving a base volume of 8m³. The front wall is made entirely of glass and measures 2m wide x 2m high, equalling 4m². Depending on the glass type, here’s how it affects your heater size calculation:
If your sauna includes single-glazed glass, you’ll need to adjust the total volume accordingly. In this case, a 4m² glass area would require an additional 6m³ to be added (4m² x 1.5m³), resulting in a total computational volume of 14m³ (8m³ base volume + 6m³ adjustment).
If you’re using double-glazed glass, the adjustment is slightly less. A 4m² area of double-glazing would require an additional 3m³ (4m² x 0.75m³), giving you a total computational volume of 11m³ (8m³ + 3m³). This adjusted volume helps determine the correct sauna heater size to ensure consistent heat.

Consider the door location making sure it opens outwards, as well as the heater placement, size, safety rails or heat shielding, and windows when designing the optimal layout for the space.
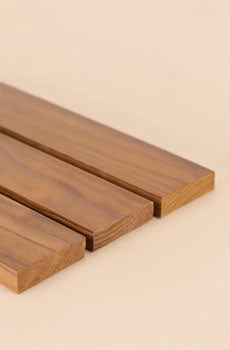
Timber Choices
Sauna environments are high in heat and humidity, so it's essential to use timber sauna materials that can withstand these conditions without warping, releasing resin, or becoming uncomfortable to the touch. At Finnmark, we offer both natural timber and thermally modified wood species, such as:
When selecting wood for Sauna Benches and cladding, it’s important to choose types that remain cool to the touch, resist warping, and don’t release resin or splinters when exposed to high heat and humidity. Among the top choices for benches and cladding are cedar, aspen, alder, and thermo-treated woods. These woods have smooth surfaces and excellent thermal properties, ensuring longevity and that they don’t become uncomfortably hot during use.
Always refer to the recommended wastage allowance for each timber species, as the approximate materials loss during installation can vary between 5 and 15%.
For sauna door frames, durability and stability are key, as the door undergoes frequent use and temperature fluctuations. The frames are made of popular sauna woods, such as alder, aspen, pine or their upgraded thermo-treated alternatives.
Sauna Lighting
Sauna lights play an important role in creating a relaxing and welcoming atmosphere, while also needing to withstand high heat and humidity. Many people prefer energy-efficient LED spotlights and strip lights. For placement of strip lights, they are often mounted onto the bench lips or backrests, while most spotlights can be installed in the ceiling and on the benches.
Just be sure to check their temperature limits and recommended mounting heights. For a more traditional sauna feel, wall or corner lights with wooden shades provide a soft, warm glow. If you’re looking to add a touch of luxury, fibre optic sauna lighting offers gentle, ambient illumination that enhances the overall sauna experience.
Sauna Accessories
Incorporating sauna accessories like Sauna Speakers, Diffusers, and Headrests can elevate the atmosphere of any sauna space. Whether it's enjoying calming music, the scent of essential oils, or improved support during sessions, thoughtful accessories help transform the sauna into a tailored wellness retreat.
Other Components
In addition to the main structure and essential materials, there are several optional components to consider when designing your sauna:
-
Tiling & stone may be used on floors or wall sections for durability, safety, design features or splashbacks behind the heater.
-
Wooden feature walls can add visual warmth and character to your sauna design, often using contrasting timber or unique profiles to create a focal point.
-
Heat shielding is essential when the heater is close to combustible materials. Proper shielding using stainless steel plates ensures safety and compliance with installation regulations.
 Choose materials that are specified for saunas and create a design that aligns with your personal preferences while adhering to safety regulations.
Part 2
How to Build a Traditional Finnish Sauna - Pre-Checklists
Before starting your DIY sauna project, we recommend reading this full step-by-step guide to gain a clear understanding of the process. This guide is intended as a general resource to help guide your build. Please note that there are multiple methods and approaches to constructing a sauna, and the best practice may vary depending on your specific space, requirements, and local regulations.
This guide provides general advice for informational purposes only and should not be considered as a definitive or exhaustive instruction manual.
Always consult with qualified professionals, such as a certified electrician for electrical installations or a HETAS-registered engineer for wood-burning sauna stoves and flue systems, to ensure your build is safe, compliant, and suited to your setup.
Pre-Installation Checklist
-
Check that you have all the necessary equipment and materials prepared before beginning, including tools, fixings, insulation, and any specialist items for your chosen design.
-
Record all critical dimensions. This includes stud-to-stud measurements, door and window openings, ventilation cut-outs, and the spacing between sauna battens.
-
Confirm the routes for all electrical cabling and the planned location of components such as the heater, lighting, thermostat, and control unit.
-
Review your ventilation layout and mark the placement of intake and exhaust vents to ensure effective airflow and compliance with installation requirements.
-
Identify all surfaces that will require fireboard installation, particularly areas surrounding the sauna heater or flue system if used.
-
Make note of the wall and ceiling build-up layers, including insulation, vapour barriers, battens, and cladding, to ensure accurate spacing and fit.
-
Check for any features that require additional preparation, such as timber feature walls, tiled splashbacks, or backlit panels.
-
Ensure the orientation of sauna battens and cladding is correct. Battens must always run perpendicular to the cladding direction to maintain airflow and structural support.
-
Mark the glazing lines and confirm any spacers or mounting channels needed for installing glass doors or panels.
Equipment Checklist
-
Low-tack painters’ tape
-
Tape measure
-
Laser measure
-
3-axis laser level
-
Spirit level
-
Folding square
-
Stainless steel nails
-
Narrow crown stapler/Brad nailer
-
Pencil
-
Combi Drill
-
Impact driver
-
Multitool
-
Saw
-
Tape measure
-
Hammer
-
Quick clamps
How to Build a Traditional Finnish Sauna: Step-by-Step
This section is a detailed, step-by-step guide on installation when it comes to how to build your own sauna. It covers the construction sequence, including how to assemble each layer, fix components in place, and install the key structural elements.
The included images are for visual reference only and should not be used for scaling or measurements. In some drawings, the front walls or ceilings are hidden to show clear visualisation, where studwork is hidden, it’s marked for reference on the images.
If you are ever uncertain of any measurement or detail, please contact Finnmark Sauna.
Installing Your Home Sauna - Step By Step
Once you have completed all of the preparations and pre-installation checks, it's time to move forward and complete your sauna installation. Following the outlined steps will guide you through each stage.
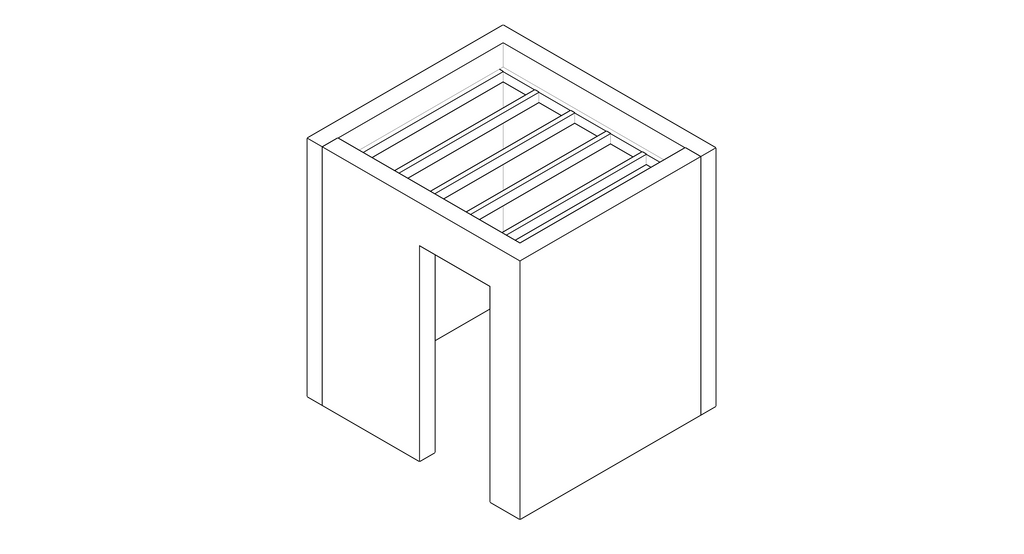
STEP 1 - Construct Any Required Studwork
Ensure that all walls and ceiling surfaces are perfectly plumb, level, and square before beginning any installation. This foundational step is crucial for proper alignment, structural integrity, and achieving a clean, professional finish throughout the sauna build.
STEP 2 - Fix Electrical Cables
Before insulation and wall build-up, electrical cables need to be installed and fixed in place. This includes cables for the heater, controller, lighting, and any mechanical ventilation.
-
Check all cable routes and mark the location of each electrical component
-
Fix the electrical cables
-
You can also fix the extractor fan/fans at this stage
The electrical cables for the sauna heater and lighting should be fixed by a qualified electrician.
For an Electric Sauna Heater, the cables usually include:
-
The rubberised heater cable (i.e., H07RN-F): Runs from the isolator to the electric heater or from the isolator to the heater’s contactor box and another from the contactor box to the heater location.
-
A cable to the ventilation fan: Rubberised 3 core 1 mm2 H07RN-F if the cable runs from the heater. 3 core 1 mm2 flex cable if it runs from a contactor box located outside the sauna. It may be helpful to fix the ventilation fan at this stage as a target for routing the cable.
-
A controller cable: If the sauna has a control panel located externally to the sauna, this cable from the heater location or the heater’s contactor box should be routed to the desired control panel location.
-
Thermostat cable: Refer to the sauna controller manual to determine the correct location for the thermostat within the sauna, and run the cable accordingly.
With a Wood-Burning Heater, only the sauna lighting cables need to be installed at this stage; no heater wiring is required.
Ensure pre-installation specification has been met.
STEP 3 - Ventilation routes + Holes
The Ventilation system usually consists of a passive air intake low down near the sauna heater and a mechanical extraction vent in the opposite corner of the sauna at a high and a low level. Make sure all the joints are air and vapour-tight, any bends must be gradual so they don’t restrict airflow, and the ducting routes must be constrained. Fit the exterior vent covers in place. Further ensure the following steps are taken.
-
Ensure proper drainage gradient - Route ventilation ducts with a slight downward gradient to allow any condensation to either drain safely out through an external vent or return into the sauna where it can evaporate. This prevents moisture buildup inside the ducting.
-
Use gentle bends in ducting - Avoid sharp turns. All bends should be gradual to maintain consistent airflow and prevent unnecessary restrictions within the ventilation system.
- Keep ducting neat - Plan your ducting layout carefully. Routes should be as short and direct as possible, with minimal crossings or clutter. Secure cleanly along walls or framing, keeping the installation tidy and unobtrusive.
STEP 4 - Fire-Rated Plasterboard
Measure and cut the fireboards to size. Measure and cut the penetrations for the cables and ventilation. Begin with the ceiling with screws at 200 mm centres and 150 mm centres at the edges of the boards. Next, fit the wall boards with screws at 300 mm centres and 200 mm centres at the edges of the boards. Seal all the joints, holes and around the penetrations using intumescent sealant. It is best practice to mark the joist locations onto the wall to make it easier to find them when installing the insulation. Finally, mark the stud locations on the floor. You can use masking tape.
STEP 5 - Insulation & Vapour Barrier
This step involves dealing with Insulation and Vapour Sealing. Insulation boards such as Kingspan Sauna- Satu or Finnfoam are 30 mm thick with tongue-and-groove edges and usually measure 1200 mm in length. They can be installed either vertically or horizontally. It’s essential to seal all joints according to the manufacturer’s instructions, using low-expansion foam around edges and joins, and aluminium foil tape on the board surfaces. All cable and ventilation penetrations must also be carefully sealed with foam and aluminium tape to ensure airtightness and proper vapor barrier performance.
Follow these steps when installing insulation boards on masonry walls:
1. Measure and cut the insulation boards to size
2. Apply low-expansion foam into the groove edges of the boards
3. Secure the boards to the walls and ceiling using stainless steel screws with insulation washers, or concrete screws for masonry
4. Cut holes for ventilation
5. Pull ventilation ducts through the insulation boards
6. Once the foam has set, trim off any excess
7. Apply aluminium foil tape to all joints
8. Seal the corners of the sauna room
9. Seal around cable penetrations to ensure airtightness
You can find full installation instructions for sauna insulation boards under the downloadable files on the Kingspan Sauna-Satu product page.

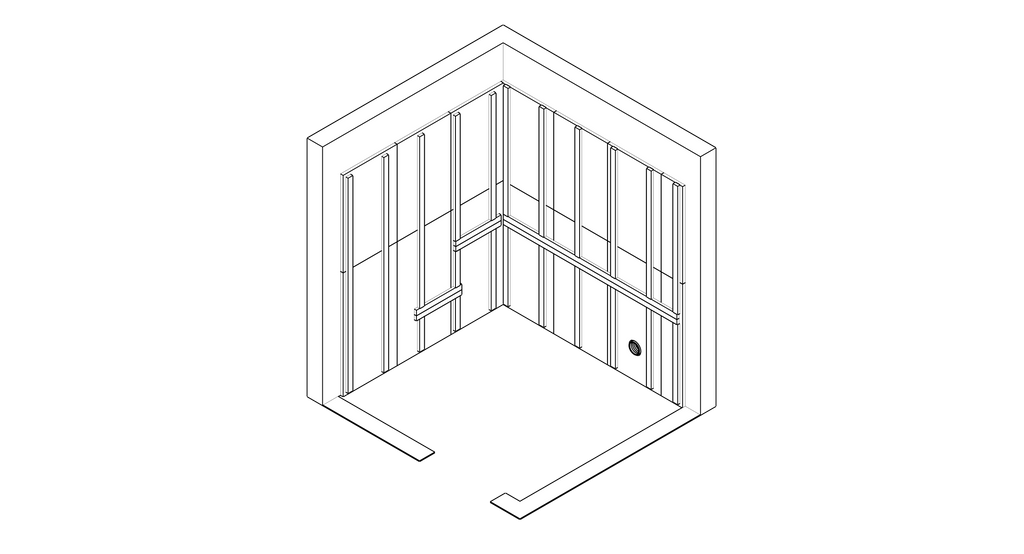
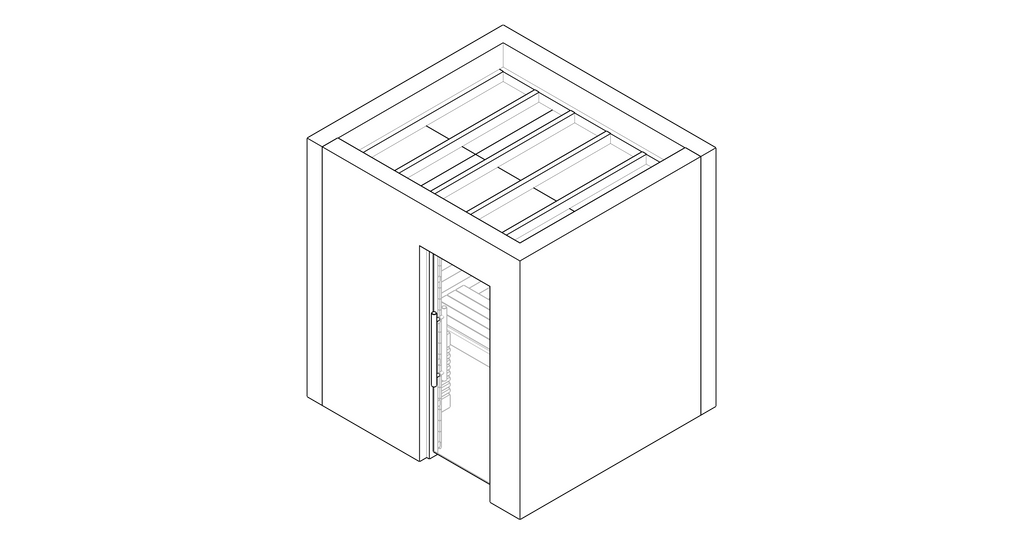
Fix insulation to interior surfaces of sauna (front walls and ceiling hidden).
STEP 6 - Battens
Sauna Battens leave a gap between the insulation boards and the interior cladding, allowing condensation to drain off the vapour barrier onto the floor. They also provide a foundation to fix the sauna cladding to. The battens are installed perpendicular to the orientation of the cladding.
If the battens are fixed into masonry, we recommend using concrete screws or wall plugs with wooden screws.
The battens should be kept clear of the room corners by a minimum of the thickness of the batten.
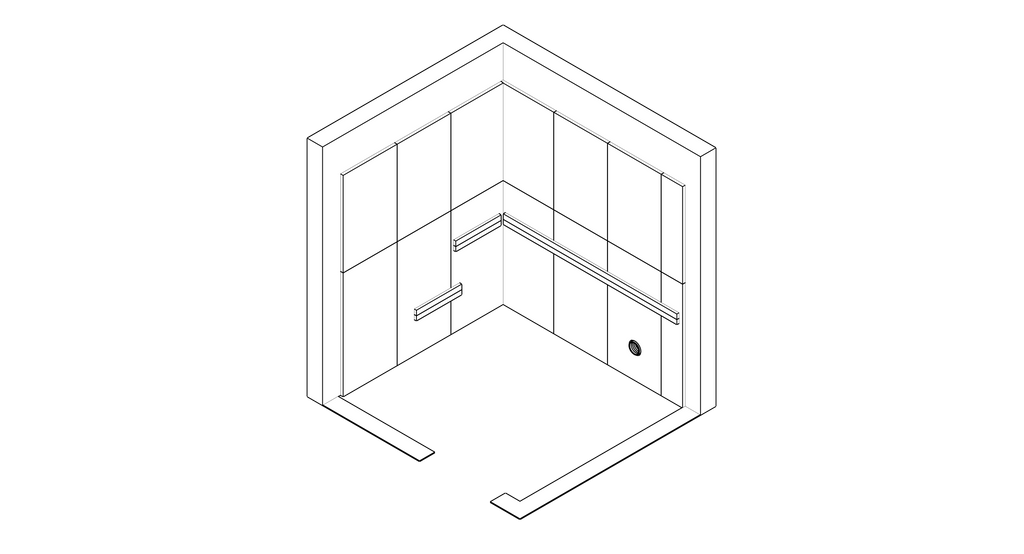
Fix battens to walls to support the benches.
Follow these steps to install the battens:
1. Measure and cut the battens to the required length, keeping them short of the corners by the thickness of the batten
2. Pilot drill the holes at 400 mm spacings
3. Fix the battens to the ceiling and the walls using 100 mm screws. Be mindful not to overtighten the screws
4. Add battens to areas that require a strong fixing substrate behind the cladding. As an example, if you intend to fix a wall-mounted electric sauna heater
5. Level the ceiling battens
6. Plumb and square the wall battens
Fix battens to walls and ceiling.
STEP 7 - Second Fix of Electrical Cables
This step typically involves routing heat-resistant cables, such as those for sauna Lighting, the thermostat, the electric heater controller, and the door switch, along the vapour barrier and positioning them before installing the ceiling and wall cladding. All electrical connections must be completed by a qualified electrician.
Always follow the manufacturer’s instructions for the exact placement of the thermostat, controller, and door switch. If the controller is from a different manufacturer than the heater, consult its specific guidelines. Avoid running cables behind the sauna battens. Make any necessary penetrations through the insulation and fireboard, sealing them with intumescent sealant or fire-rated foam. Finally, seal the vapour barrier with a suitable silicone sealant to ensure airtightness.
STEP 8 - Decorative Wall Panels (If Included in the Design)
If your sauna design includes Decorative Wall Features, such as a splashback behind the sauna heater or a feature wall made of log stacks or decorative wooden panels, they should be installed before the rest of the wall cladding. Decorative, wooden feature wall panels are usually applied to a plywood backing. They can be dimensioned, sawn and fixed to the battens by hiding screws between the decorative feature wall elements on the boards.
Follow the steps below to install these panels correctly:
1. Measure and mark the dimensions of the decorative panel, allowing space for any required mouldings and leaving a 15 mm gap to the floor
2. Cut and prepare the panel to size
3. Fix the panel to the wall battens using screws at a maximum 300 mm centres. Hide the fixings between the decorative elements where possible
4. If using multiple panels or applying decorative features across more than one wall, carefully plan the order of installation
5. Consider whether additional corner or end mouldings are required to complete the finish, depending on your sauna’s design
STEP 9 - Corner Mouldings (Only Specific Corner Moulding Profiles)
Only specific corner mouldings, including the SI Moulding 25 x 25 mm and Internal Corner Moulding 27 x 27 mm for 15 mm cladding, require the installation of the moulding to occur before the cladding installation. If you’re not using either of these, you can move on to step 10.
Follow these steps for SI Moulding 25x25 mm and Internal Corner Moulding 27x27 mm Installation:
1. Treat the mouldings with paraffin oil
2. Measure and cut the mouldings to length with mitres at the corner joints
3. Keep the vertical corner beads at least 15 mm from the floor
4. Ensure any breaks are gently sanded for a smooth finish
5. Dry fit the mouldings until they are the correct length and keep tight joints in the corners. Fix the mouldings to the battens
STEP 10 - Glazing Channels, Windows and Frames
With most installations, it is good practice to install the glazing channels, window and door frames before the cladding. This ensures a clean, tight finish between the cladding and glazing elements.
Follow these steps for installing glazing channels:
1. Begin by measuring the head of the glazing aperture and cut an aluminium channel to length. A chop saw is recommended for a clean cut
2. Pilot drill and countersink the fixing holes in the channel at a hole spacing of approximately 200 mm - 300 mm
3. Align and fix the channel in place
4. Measure the lower channels, ensuring the opening between the channels and the wall is equal to the width of the door and its required gaps. Cut the channels to length
5. Insert the wall plugs and screw the channels in place
6. Do the same with the vertical channels
7. Once all of the channels are in place, remove the floor channels until the glazing stage of the sauna installation (step 16)
External glazing should be installed before sauna construction begins to ensure a proper seal with the sauna’s vapour barrier. As glazing requirements can vary depending on the sauna’s location and design, they should be planned carefully. UPVC windows are not suitable for use inside the sauna and must be protected with an internal timber or aluminium-framed window to withstand high heat and humidity.
The timber door frame should be installed before cladding begins, ensuring it is square, level, and securely fixed. This allows the wall cladding to be neatly fitted up to the frame for a clean finish. As with all timber elements in the sauna, the frame should be made from suitable heat- and moisture-resistant wood.
STEP 11 - Cladding
The cladding stage involves the installation of tongue and groove sauna cladding, mouldings and trims. Make sure that the cladding orientation is correct and perpendicular to the batten orientation.
Make sure to note the centre points of penetrations, such as ventilation holes from adjacent battens or cladding.
Begin with the ceiling cladding and move on to the wall cladding afterwards.
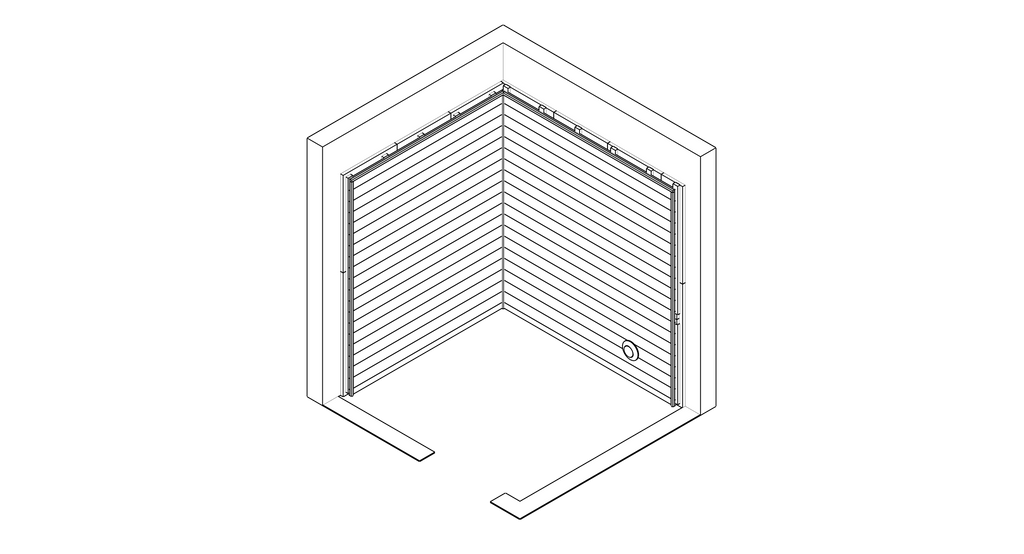
Clad the walls and install the vent covers
STEP 12 - Ventilation Covers
The final step of the Sauna Ventilation system is fitting the covers, louvres, grilles, or valves. Check if any additional sealing is needed between the ducting and the cover components to ensure an airtight fit.
Follow these steps:
1. Seal the inside of the ducting to the cladding using a male coupler cut to length by using aluminium foil tape
2. Wooden disc valves may require a metric thread glued into a captive nut on the wooden disc
3. Screw the back plate to the cladding for any disc valves
4. Screw the disc valve into the backplate until it’s approximately 15-20 cm from the backplate
5. Aluminium louvre grille vents should be installed into the cladding with the grilles level and the sloped fins pointing down
STEP 13 - Benches & Heater Guards
Installing the Sauna Bench system is one of the final interior steps and can vary in time depending on your design. A simple two-tier sauna bench boards setup along one wall may take just a couple of hours, while more intricate layouts with floating benches or additional features can take a full day. Sauna bench boards can be fixed directly to the wall with bearers or installed on frames and legs. Make sure everything is level and plumb, and leave a consistent 5 mm gap between the bench boards and the wall cladding. If you're using strip lighting, it can be installed at the same time.
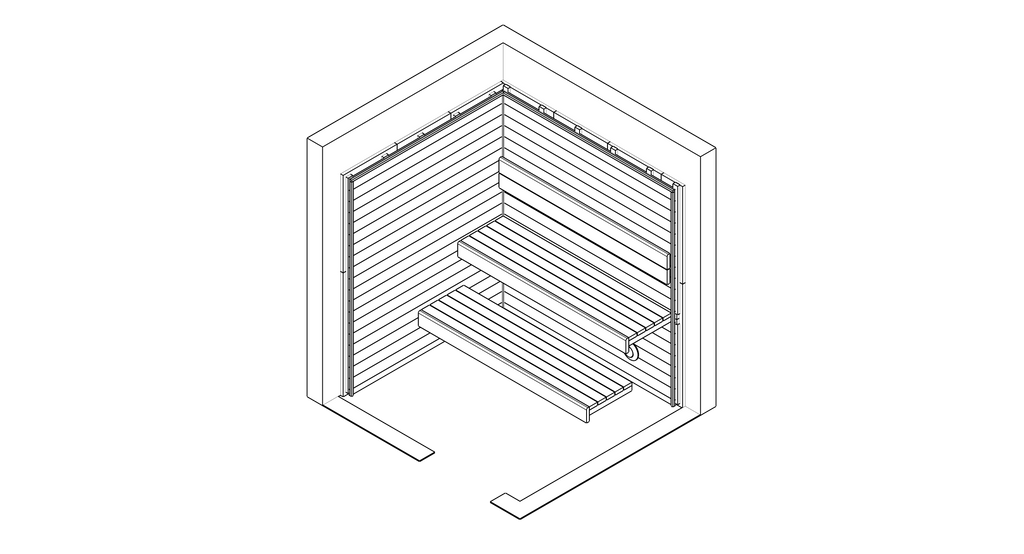
Install the benches.
Follow these steps to install your bench system:
1. Begin by installing the upper bench
2. Fit the armrests if part of your design
3. Install the backrest
4. Add the lower bench
5. Fit bench skirting, if included
6. Install the step or raised floor if the design incorporates one
7. Finish with the heater guard for added safety
STEP 14 - Lighting
Fix the lights and drivers securely in place, adhering to the manufacturer’s installation manual. to ensure proper function and safety. Make sure that all components are rated for sauna use and suitable for the intended installation location, whether on the ceiling, wall, or under benches. Where necessary, use heat-resistant fixings and supports to protect wiring and drivers from high temperatures and moisture.
STEP 15 - Heater
Electric sauna heaters must be installed by a qualified electrician. For wood-burning sauna heaters, it’s strongly recommended to consult and work with a HETAS-registered engineer, as they are trained to handle flue systems and meet fire safety regulations.
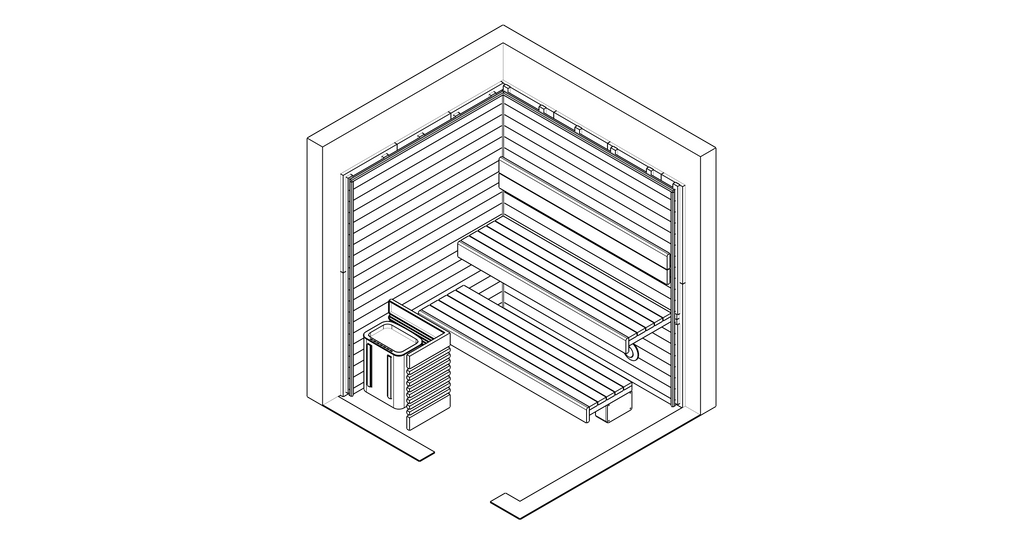
Fix the heater and heater guard in position.
STEP 16 - Glazing
The glazing may include windows and a sauna door with wooden frames or aluminium channels. UPVC should never be used inside a sauna, as it is not suitable for high-heat environments. Always handle glass with care, using appropriate protection for your hands and eyes. Inside the sauna, glazing panels must be sealed using heat-resistant glazing silicone for a secure, long-lasting finish.
Install the glazing, including the door.
STEP 17 - Cleaning
Once construction is complete, it’s essential to thoroughly clean your sauna and inspect all components to ensure optimal performance and long-term durability.
We recommend using the following equipment:
-
Vacuum cleaner
-
Wonder wipes
-
Microfibre cloth
-
Glass cleaner
-
Steam iron
-
Sander
-
Paraffin oil
-
Fillers/wax
-
Wood repair pens
-
Mitre bond glue
We recommend these steps to clean your sauna:
1. Fill pinholes in the cladding, trims and window beads using an appropriate colour matched wax or filler
2. Sand any dents and scratches
3. Wipe over any sanded areas with a cloth
4. Oil the timber after filling dents and sanding
5. Vacuum the sauna
6. Clean glass surfaces
7. Check that the lights are working properly
8. Turn on the heater to check that it works properly
9. Check that the fan is working
10. Ensure the lower vent is open
11. Once the heater is up to temperature, pour a little bit of water over the hot stones to clean any remaining dust or residue
STEP 18 - Heat Shielding (If Applicable)
This step is only applicable for installations where the sauna heater’s minimum required safety distances to combustible materials, such as wood, cannot be observed. This could be the case if the heater is positioned close to the wall or where the ceiling is too low above the heater. The heat shielding should be made of non-combustible finishes, such as tiling or specialist metals or stainless steel heat shields.
Part 3
Sauna Cleaning, Care & Maintenance
Proper sauna care requires regular sauna cleaning and maintenance to keep it functioning optimally, prevent the build-up of dirt, sweat, and moisture, and maintain its aesthetic appeal over time. This routine care helps ensure a hygienic, safe, and enjoyable sauna experience for years to come. Follow these steps to clean your sauna correctly.
Step 1: Allow the Sauna to Dry Thoroughly
After your sauna session, make sure the sauna is completely dried out to prevent mildew or damp issues. Remove any standing water by squeegeeing it into a floor drain or mopping it dry.
Step 2: Use the Heater & Ventilation to Aid Drying
Run the heater for longer than the session to help dry the space further. Keep the ventilation running to circulate air. After the heater cycle finishes, you can open windows or the sauna door to speed up drying, unless there’s an adjacent room (anteroom, shower, etc.) that could be damaged by heat or steam.
Step 3 - Clean and Dry the Floor & Duckboards
Lift any duckboards, clean them, and place them in a safe, dry spot. Mop the floor using water and a suitable floor detergent. Pour leftover cleaning water down the sauna drain to keep the waste trap full and sterile.
Step 4 - Wipe Down Sauna Bench Boards & Cladding
Using a mix of Sauna Cleaner and water (following product instructions), carefully wipe any dirty or wet sauna bench boards with a soft, non-terry cloth or sponge. Wear rubber gloves and protective equipment. Take special care with cladding to avoid splinters. Using a seat cover during sauna sessions is best practice and helps protect the benches from sweat and dirt.
Step 5 - Clean Glass Surfaces
Clean glass windows, doors, and walls with glass cleaner to remove oily water marks caused by steam residues.
Step 6 - Heater Care and Safety
Do not touch or clean the heater until at least 24 hours after use. Sauna cleaning is rarely needed after every session unless hard water causes limescale buildup, which should be treated carefully. Never dry Towels, textiles, or equipment near or on the heater or heater guard. This is a significant fire risk, even when the sauna is cooling.
For further information, read our Complete Guide to Cleaning Your Sauna. Finnmark also offers its own Servicing and Maintenance Services to ensure your sauna is kept fresh and maintained to the highest standard.

Part 4
Sauna Use & Well-Being
To get the most from your sauna, both in terms of relaxation and well-being, it’s essential to use it mindfully and safely. A sauna should be an enjoyable and restorative experience. Only use the sauna when you're in good personal health, and always pay attention to how your body feels throughout each session.
Temperature & Length of Sauna Sessions
Sauna temperatures should be set with consideration for all users, ensuring a comfortable and relaxing environment. Most users should be able to relax comfortably for 15-30 minutes, but this can vary greatly depending on personal tolerance, experience, and how you’re feeling that day. Some people may prefer shorter sessions, while others enjoy a little longer; there’s no one-size-fits-all.
The key is to always listen to your body and avoid pushing yourself beyond your comfort level. Throughout your session, water can be added to the sauna stones to increase steam and humidity, creating a more immersive and enjoyable environment, but moderation and self-awareness are essential for safe and effective use. You should never force yourself to stay in the sauna beyond your comfort level. A safe and enjoyable sauna experience depends on listening to your body and exiting the sauna when you feel the need to cool down or rest.
Avoid Sauna Use When Unwell
It’s important to avoid using the sauna if you’re feeling unwell or experiencing illness. Despite common misconceptions, sauna use during sickness, especially when paired with cold plunges or cryotherapy, can make symptoms worse and put added stress on your body. While regular sauna sessions may contribute to overall wellness and support immune health, they should only be enjoyed when you’re in good physical condition. Listening to your body and resting when needed is just as essential to your well-being as the sauna itself.
Avoid Substance Use
Saunas should not be used in conjunction with alcohol, narcotics, stimulants, or painkillers. These substances can impair your body’s natural ability to regulate heat, putting you at greater risk of overheating, dehydration, or even fainting. They may also dull your awareness of discomfort or warning signs, making it harder to listen to your body and respond appropriately.
Medical Conditions & Sauna Use
Sauna use is not recommended for individuals with cardiovascular conditions. If you have any other medical concerns or are taking medication, it's essential to consult your doctor before using a sauna. Even with medical approval, it’s important to ease into sauna use gently, starting with lower temperatures and shorter sessions. Gradually increase the heat, duration, and humidity over time, always monitoring how your body responds. Taking a cautious, step-by-step approach helps reduce the risk of aggravating existing health issues and ensures a safer, more enjoyable sauna experience.
Sauna Use & Children
In Finland, it’s common for children as young as six months to be introduced to the sauna at lower temperatures and under close supervision. While Finnmark Sauna does not provide an official minimum age, we strongly recommend that anyone under 18 is always supervised by a responsible adult. Parents choose to bring children into the sauna at their own risk.
Pre- and Post-Sauna Hygiene
Always shower before and after sauna use. Avoid using heavily perfumed or harsh soaps, shampoos, or shower gels, as your skin and pores will be more sensitive after exposure to heat.
Hydration and Cooling Down
Make sure you’re well hydrated before entering the sauna, and remember to replenish fluids afterwards. For a revitalising and balanced thermal cycle, consider pairing your sauna session with a cold plunge, cold shower, or another form of cryotherapy.
However, it’s important to finish your session by warming up gradually. Resting on the lower bench allows your body to return to a comfortable temperature naturally. Avoid ending your session while still very hot or very cold, as this can leave you sweating or shivering long after you've stepped out of the sauna.
For further information on sauna use and wellbeing, explore our Sauna Etiquette and Sauna for Health frequently asked questions.

PART 5
Top 10 Mistakes When it Comes to How to Build Your Own Sauna
Building your own sauna is an exciting and rewarding project, but it comes with its fair share of challenges. Avoiding these common pitfalls can save you time, money, and frustration while ensuring a far better end result.
1. Skipping Ventilation
Proper airflow is essential for a comfortable and healthy sauna. Neglecting ventilation leads to stuffy heat, uneven temperature distribution, and potentially mould growth. A good ventilation plan ensures fresh air circulation, enhances “löyly” or the steam quality, and prolongs the life of your sauna.
2. Underpowering the Heater
Underestimating your sauna’s computational volume, which includes glass and uninsulated surfaces, often results in an underpowered heater. This means longer heat-up times, disappointing steam and a low temperature, and an overworked heater. The elements may burn out quickly, leading to frequent maintenance and higher long-term costs.
3. Using the Wrong Insulation
Not all insulation is suitable for sauna use. Materials like PIR- boards can off-gas toxic chemicals when exposed to high temperatures. Always use sauna-safe insulation, such as specialist sauna insulation boards like Finnfoam or Kingspan Sauna-Satu, or mineral wool, paired with a proper vapour barrier, like aluminium foil.
4. No Drainage Plan
Water spills are inevitable in any sauna, whether from steam, washing, or ladling water onto the stones. Without proper drainage, moisture can accumulate and cause long-term damage. Plan for floor drainage from the outset.
5. Poor Bench Placement
Bench height and positioning matter more than many realise. If your feet sit below the top of the heater, you’ll likely experience cold feet and poor steam circulation. A tiered bench layout, with the main bench above heater level, makes for a far more enjoyable sauna.
6. Improper Cable Choices
Standard household wiring isn’t built to handle sauna temperatures and can degrade or melt. Use only heat-rated rubber or silicone cables designed specifically for high-heat environments to ensure safety and reliability.
7. Forgetting the Fireboard
Omitting a non-combustible fireboard behind or near your heater is a serious safety oversight. Fireboard protects surrounding walls from excessive heat and significantly reduces fire risk—an essential part of safe sauna design.
8. Poor Heater Placement
The position of the heater plays a crucial role in how heat and steam circulate within the sauna. Incorrect placement can lead to uneven temperatures and weak "löyly." Ensure the heater is installed in a location that promotes effective air movement and steam distribution, always following the manufacturer’s clearance and positioning guidelines for optimal performance.
9. Overusing Glass
Glass looks elegant and modern, but it greatly increases the sauna’s computational volume, putting extra demand on your heater. If you’re incorporating glass, either double-glaze to improve insulation or size up the heater accordingly to maintain proper performance.
10. Ignoring Post-Sauna Drying
Failing to ventilate and dry the sauna after use can lead to long-term issues with damp, mould, and timber rot. Always open vents or doors after each session to allow moisture to escape and surfaces to dry completely.
Building a sauna requires careful planning, high-quality materials, and adherence to safety regulations. Whether you choose an indoor or outdoor sauna, following these steps will ensure a durable, efficient, and relaxing space. By considering insulation, ventilation, and the right heating system, you can create the perfect sauna retreat for years to come.
How To Build Your Own Sauna: FAQs
Do I need planning permission for an outdoor sauna?
In most cases, you don’t need planning permission for a small, detached outdoor sauna, as it often falls under permitted development rights. However, it’s always best to double-check with your local planning authority, especially if you live in a conservation area or are planning to install a wood-burning sauna in a smoke control zone. Rules can vary depending on location and property type, so confirming in advance can save time and avoid complications later.
What is the ideal size for a DIY sauna project?
A standard, comfortable 2 person sauna measures around 2m x 2m, but sizes vary based on preference and available space, and they can be smaller or larger than this. We recommend a 2.1m finished internal height for the sauna. You may need to consider lowering the ceiling height if it is over 2.1m.
Which is better: A wood-burning or an electric sauna heater?
This is completely up to personal preference and your DIY project. Wood-Burning Heaters offer a traditional sauna experience but have higher upfront costs due to flue kits and heat shielding, with no ongoing electricity expenses, just firewood. Electric Heaters provide modern convenience, easy maintenance, and precise control, but require a suitable power supply, especially for most models over 9 kW that may require a 3-phase connection.
Read our Buyer’s Guide to Sauna Heaters to help you choose the best heater for your sauna.
How To Build A Sauna At Home: Final Thoughts
This comprehensive step-by-step guide has walked you through every stage of how to build a sauna at home – from early planning to long-term care. We've covered everything, including essential, pre-build considerations and detailed pre-checklists, to step-by-step construction instructions. You’ve also learned about key cleaning and maintenance routines, and how to get the most from your sauna in terms of wellbeing and regular use.
Whether you're asking how to build an outdoor sauna or how to build an indoor sauna, the insights here apply to both, offering clear and practical guidance to suit a wide range of spaces, styles, and user preferences. We hope this guide has provided everything you need to know about building your version of Finnish saunas. If you have any further questions or need more tailored advice, take a look at our FAQs following this guide or get in touch with the team at Finnmark.
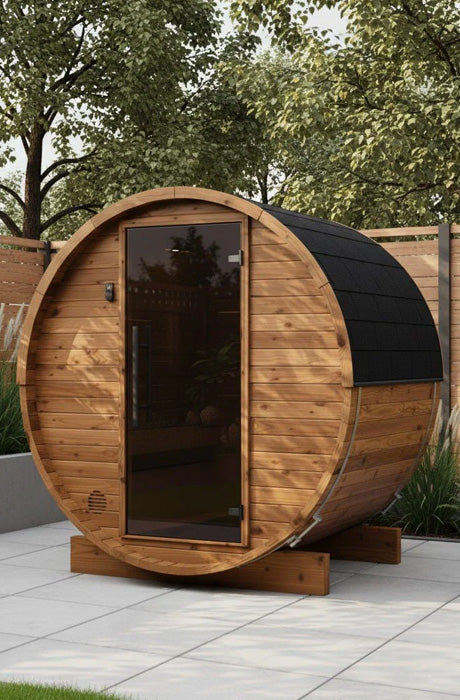
Not Into DIY? Finnmark Has You Covered
DIY project not for you? At Finnmark, we offer a Bespoke Sauna Installation Service for those who want the luxury of a professionally built sauna without managing the details. Get inspired by our sauna installations and explore endless possibilities from our expertly crafted designs including Barrel Saunas, which blend tradition and modern aesthetics.
Get In Touch today with one of our expert advisors and take the first step toward creating your dream sauna.
If you prefer professional help from start to finish, why not consider a bespoke sauna installation service? Get inspired by our sauna installations.


